

Fixing a hole in the wall can seem like a daunting task, but with the right tools and guidance, it’s a job anyone can tackle. Whether it’s from an accidental bump or a more significant impact, repairing a hole in drywall doesn’t have to be difficult. This comprehensive guide will walk you through the steps to fix a hole in the wall, ensuring a smooth and professional finish. With careful attention to detail, even a novice can handle this common home repair task, turning a damaged wall into a flawless surface once more.
Assessing the Damage
Before you begin, it’s essential to evaluate the size and scope of the hole. Different techniques are required for small holes, medium-sized ones, and large holes. This initial assessment will help you determine the materials and time needed for the repair. By understanding the nature of the damage, you can plan your approach effectively and avoid potential mistakes that might complicate the repair process later. Proper assessment ensures that you choose the right method and materials, saving you both time and frustration.
Small Holes
These are usually less than 1/2 inch in diameter and can be easily fixed with spackle or a similar compound. Small holes often result from nails, screws, or minor dings and can be addressed quickly without the need for specialized tools. In most cases, the repair process for small holes is straightforward and can be completed in under an hour. By focusing on precision and cleanliness, you can achieve an almost invisible repair that blends seamlessly with the surrounding wall.
Medium Holes
Holes between 1/2 inch and 6 inches often need a patch kit to ensure they are adequately covered and supported. These holes might stem from doorknobs or accidental impacts, requiring a more robust solution than spackle alone. A drywall patch kit typically includes a self-adhesive mesh that provides additional stability, preventing future cracking or crumbling. By using a patch kit, you ensure that the repair holds up over time, maintaining the wall’s structural integrity.
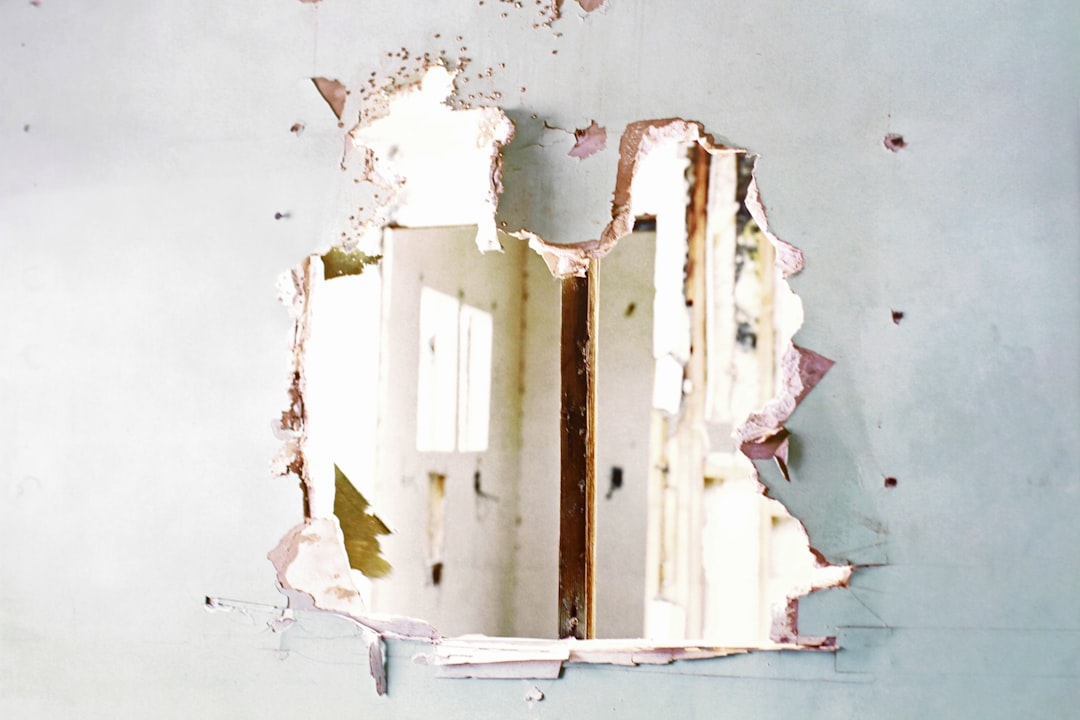
Large Holes
Large holes, over 6 inches, require more substantial repairs, including cutting out a section of the drywall and replacing it. These types of damage might be caused by accidents during moving, plumbing repairs, or other significant impacts. Repairing large holes involves more steps and precision, as you’ll need to seamlessly integrate a new piece of drywall with the existing surface. While this process is more involved, following the steps carefully will yield a professional-looking result.
Gathering Your Materials
Having the right tools and materials before you start will make the process go smoothly. Here’s what you’ll need:
- Drywall patch kit or drywall sheet
- Joint compound or spackle
- Drywall knife
- Sanding sponge or sandpaper
- Utility knife
- Measuring tape
- Pencil
- Paint and primer
- Paintbrush or roller
Having these materials on hand will help you avoid interruptions during the repair process. Each tool and material plays a crucial role in ensuring a seamless repair, from cutting and shaping to smoothing and finishing. Make sure to select high-quality products, as they can significantly influence the durability and appearance of the repair. Taking the time to gather everything you need before starting ensures a more efficient and stress-free experience.
Fixing Small Holes
For small holes, you can get by with some spackle and a little finesse. Here’s how:
Step 1: Clean the Area
Use a damp cloth to wipe away any dust or debris around the hole. This ensures the spackle adheres properly. Proper cleaning is crucial because any lingering particles can interfere with the adhesion of the spackle, leading to a subpar finish. Take a moment to inspect the surrounding area for any additional imperfections that might need addressing.
Step 2: Apply the Spackle
Using a putty knife, apply a small amount of spackle over the hole. Spread it evenly, feathering the edges so it blends with the wall. Feathering is important as it prevents a noticeable ridge from forming around the repair site. If needed, apply a second layer for deeper holes, ensuring each layer is thin and even.
Step 3: Let It Dry
Allow the spackle to dry completely. This usually takes a couple of hours, but check the product instructions for exact drying times. Drying times can vary based on the environment and the thickness of the application, so patience is key. Rushing this step could result in a compromised repair that won’t hold up over time.
Step 4: Sand Smooth
Once the spackle is dry, use a sanding sponge or sandpaper to smooth out the surface until it is flush with the wall. Sanding is a crucial step in achieving a professional finish, so take your time to ensure there are no bumps or uneven areas. Use a gentle touch to avoid removing too much material and creating a depression.
Step 5: Paint
Apply primer first, followed by matching paint to complete the repair. Primer helps the paint adhere better and ensures an even color. Painting not only restores the wall’s appearance but also protects the repair from moisture and other environmental factors that could cause damage over time.
Fixing Medium Holes
Medium holes require a bit more effort, often needing a patch kit for structural support.
Step 1: Clean and Prep the Area
Like with small holes, start by cleaning the area around the hole. Ensure that the edges of the hole are smooth and free from any loose debris that might hinder the adhesion of the patch. Proper preparation sets the foundation for a successful repair.
Step 2: Apply the Patch
Use a self-adhesive patch from your drywall patch kit. Place it over the hole, pressing firmly to ensure it sticks. The patch provides a stable base for the joint compound, preventing future cracking and ensuring a long-lasting repair. Make sure the patch is centered over the hole for optimal coverage.
Step 3: Apply Joint Compound
Using your drywall knife, apply a layer of joint compound over the patch, extending a couple of inches beyond the patch edges. Feather the edges to blend with the wall. A second coat may be necessary for a perfectly smooth finish, allowing each coat to dry thoroughly before sanding.
Step 4: Let It Dry and Sand
Allow the compound to dry completely, then sand it smooth. Sanding is essential for blending the repair with the rest of the wall, so use a fine-grit sandpaper for a flawless finish. Inspect the area for any remaining imperfections and touch up as needed.
Step 5: Paint
Prime and paint the area to match the rest of the wall. Matching the paint color is crucial for a seamless repair, so consider using leftover paint from the original job or taking a sample to a hardware store for a perfect match. Painting also serves as a final sealant, protecting the repair from future damage.

Fixing Large Holes
Large holes require cutting out a section of drywall and replacing it. Here’s a step-by-step guide.
Step 1: Measure and Cut
Measure the hole and use a pencil to outline a square or rectangle around it. Use a utility knife to cut along the lines and remove the damaged section. Precision is key here, as uneven cuts can complicate the installation of the new drywall piece. Take your time to ensure straight, clean lines.
Step 2: Cut a Replacement Piece
Cut a piece of drywall to fit the hole, ensuring it matches the thickness of the existing wall. Accurate measurements are essential for a snug fit that will blend seamlessly with the existing wall. If possible, use a piece of drywall from the same batch as the original wall for a consistent finish.
Step 3: Install a Support
For large holes, you may need to install a wooden support behind the drywall. Cut a piece of wood slightly larger than the hole, insert it behind the wall, and secure it in place with screws. This support provides a solid backing for the new drywall, preventing future movement and cracking.
Step 4: Attach the Drywall Patch
Fit the drywall patch into the hole and secure it with drywall screws, ensuring it sits flush with the wall surface. Proper alignment is crucial for a seamless finish, so take your time to adjust the patch as needed before securing it in place.
Step 5: Apply Joint Compound
Spread joint compound over the seams, covering the screws as well. Feather the edges to blend with the wall. Multiple coats may be necessary to achieve a smooth finish, with sanding between each coat to eliminate imperfections.
Step 6: Let It Dry and Sand
Once dry, sand the area until smooth. This step is critical for achieving a professional finish, so take your time to ensure the surface is perfectly even. Inspect the area from different angles to catch any remaining flaws.
Step 7: Paint
Prime and paint to match the rest of the wall. This final step not only restores the wall’s appearance but also protects the new drywall from moisture and wear. Consider repainting the entire wall if the color match isn’t perfect, ensuring a cohesive look.
Finishing Touches
No matter the size of the hole, the finishing touches are essential for a professional-looking repair. Ensure the paint matches perfectly, and consider painting the entire wall if needed for a seamless finish. Pay attention to texture and sheen, as these can affect the overall appearance of the repair. Taking the time to perfect the final details will leave you with a repair that’s virtually invisible.
Tips for Success
- Always use a dust mask when sanding to avoid inhaling dust particles. Protecting your health is as important as achieving a flawless finish.
- Ensure all compound layers are dry before sanding or applying the next layer. Patience is key to preventing cracks and ensuring longevity.
- Be patient and take your time to ensure the repair is smooth and unnoticeable. Rushing through the process can lead to mistakes that are difficult to fix later.
With these steps, you can confidently fix any hole in your wall, restoring it to its original condition. Whether you’re a DIY novice or a home improvement veteran, these techniques will help you achieve a professional result every time. Taking the time to understand and execute each step will ensure that your repair is both durable and aesthetically pleasing.
Also Read How To Fix A Zipper


